Here is what I did for creating my demo cluster for OpenShift Container Platform 3.5 on Azure.
- Three masters with etcd (same hosts). These masters are also infra nodes.
- One node (We can add more nodes later if we need)
- One Azure Load Balancer with two public IP (master endpoint and router endpoint) We can’t separate these endpoints into two ALB because Azure doesn’t allow creating two or more ALBs with one backend pools.
Uploading custom image for RHEL
As I don’t use Marketplace RHEL VM, I must create and upload a custom image in advance. Please read our document if you have a Red Hat account or you can read Microsoft document.
Creating VM
Create an availability set for masters and VMs with Azure CLI 2.0. Please replace <***> with your own values.
$ export RESOURCE_GROUP=<your_resource_group_name>
$ az group create --name $RESOURCE_GROUP --location <your_location>

$ az vm availability-set create --name MasterSets --resource-group $RESOURCE_GROUP --unmanaged
$ az vm availability-set create --name NodeSets --resource-group $RESOURCE_GROUP --unmanaged

## ssh key is located at clouddrive/azure.pub

$ az vm create --resource-group $RESOURCE_GROUP --location <your_location> --name ose3-master1 --admin-username clouduser --ssh-key-value clouddrive/azure.pub  --authentication-type ssh --public-ip-address-dns-name ose3lab-master1 --size Standard_A4_v2 --image "<your_uploaded_vhd>" --os-type linux --use-unmanaged-disk --storage-account ose3wus2 --vnet-name OSEVNet --subnet NodeVSubnet --availability-set MasterSets --nsg '' --no-wait

$ az vm create --resource-group $RESOURCE_GROUP --location <your_location> --name ose3-master2 --admin-username clouduser --ssh-key-value clouddrive/azure.pub  --authentication-type ssh --public-ip-address-dns-name ose3lab-master2 --size Standard_A4_v2 --image "<your_uploaded_vhd>" --os-type linux --use-unmanaged-disk --storage-account ose3wus2 --vnet-name OSEVNet --subnet NodeVSubnet --availability-set MasterSets --nsg '' --no-wait

$az vm create --resource-group $RESOURCE_GROUP --location <your_location> --name ose3-master3 --admin-username clouduser --ssh-key-value clouddrive/azure.pub  --authentication-type ssh --public-ip-address-dns-name ose3lab-master3 --size Standard_A4_v2 --image "<your_uploaded_vhd>" --os-type linux --use-unmanaged-disk --storage-account ose3wus2 --vnet-name OSEVNet --subnet NodeVSubnet --availability-set MasterSets --nsg '' --no-wait

az vm create --resource-group $RESOURCE_GROUP --location <your_location> --name ose3-node1 --admin-username clouduser --ssh-key-value clouddrive/azure.pub  --authentication-type ssh --public-ip-address-dns-name ose3lab-node1 --size Standard_A4_v2 --image "<your_uploaded_vhd>" --os-type linux --use-unmanaged-disk --storage-account ose3wus2 --vnet-name OSEVNet --subnet NodeVSubnet --availability-set NodeSets --nsg '' --no-wait
These commands won’t enable boot diagnostics. To enable it, execute below commands.
az vm boot-diagnostics enable --storage <your_storage_account> --name ose3-master1 --resource-group $RESOURCE_GROUP
az vm boot-diagnostics enable --storage <your_storage_account> --name ose3-master2 --resource-group $RESOURCE_GROUP
az vm boot-diagnostics enable --storage <your_storage_account> --name ose3-master3 --resource-group $RESOURCE_GROUP

az vm boot-diagnostics enable --storage <your_storage_account> --name ose3-node1 --resource-group $RESOURCE_GROUP
I usually use 10GB-sized custom VHD. In this case, we must increase hard disk space for the file system containing /var/. I extended the disk size of OS disk in Azure portal page and extended the filesystem.
Also, attach one 50GB Azure Disk to each VM for docker storage.
Preparing Azure resources
Create an Azure Load Balancer as follows.
- Two frontend IP configuration: master endpoint and router endpoint
- One backendpool: three VMS with MasterSets
- Three Health probes: TCP 80, TCP 443 and TCP 8443
- Three Load balancing rules: TCP 8443/8443 with master public IP, TCP 80/80 with router public IP and TCP 443/443 with router public IP
Preparing OpenID connect
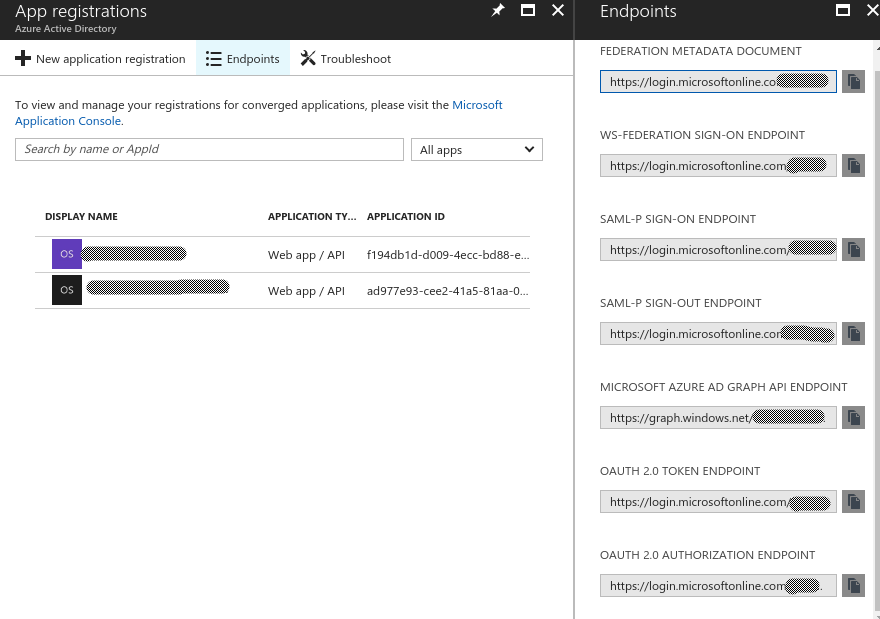
If you want to use AAD for authenticating master, you should create Azure AD App. Though I tried to create with Azure CLI 2.0, I found creating in Azure portal is the easiest way.
When you create Azure AD App, the reply URL must be “https://Application ID, OAUTH 2.0 TOKEN ENDPOINT, OAUTH 2.0 AUTHORIZATION ENDPOINT and API access key value.


Host preparation
Now I executed Host preparation.
When I executed docker-storage-setup, I selected option A) to use the added 50GB Azure Disk.
[clouduser@ose3-master1 ~]$ cat /etc/sysconfig/docker-storage-setup
DEVS=/dev/sdc
VG=docker-vg
Ansible installation
Here is my ansible inventory file.
[OSEv3:children]
masters
nodes
etcd

[OSEv3:vars]
ansible_ssh_user=clouduser
ansible_become=yes

containerized=true

deployment_type=openshift-enterprise

openshift_master_default_subdomain=<your_application_domain>

#Replace <***> with values your Azure AD App
openshift_master_identity_providers=[{'name': 'aad', 'login': 'true', 'mappingMethod': 'claim', 'kind': 'OpenIDIdentityProvider', 'clientID': '<Application ID>', 'clientSecret': '<API access key value>', "claims": {"id": ["sub"], "preferredUsername": ["preferred_username"], "name": ["name"], "email": ["email"]}, "urls": {"authorize": "<OAUTH 2.0 AUTHORIZATION ENDPOINT>", "token": "<OAUTH 2.0 TOKEN ENDPOINT>"}}]

openshift_master_cluster_method=native
openshift_master_cluster_hostname=<public hostname of master ALB endpoint>
openshift_master_cluster_public_hostname=<public hostname of master ALB endpoint>

openshift_master_overwrite_named_certificates=true
openshift_clock_enabled=true

[masters]
ose3-master1
ose3-master2
ose3-master3

[nodes]
ose3-master1 openshift_node_labels="{'region': 'infra', 'zone': 'default'}"  openshift_schedulable=true openshift_hostname=ose3-master1 openshift_public_hostname=ose3lab-master3.<location>.cloudapp.azure.com
ose3-master2 openshift_node_labels="{'region': 'infra', 'zone': 'default'}"  openshift_schedulable=true openshift_hostname=ose3-master2 openshift_public_hostname=ose3lab-master2.<location>.cloudapp.azure.com
ose3-master3 openshift_node_labels="{'region': 'infra', 'zone': 'default'}"  openshift_schedulable=true openshift_hostname=ose3-master3 openshift_public_hostname=ose3lab-master3.<location>.cloudapp.azure.com
ose3-node1 openshift_node_labels="{'region': 'primary', 'zone': 'east'}" openshift_hostname=ose3-node1 openshift_public_hostname=ose3lab-node1.<location>.cloudapp.azure.com

[etcd]
ose3-master1
ose3-master2
ose3-master3
Now I could install OCP 3.5 with these configurations.